What Is Automation In Music? Create Better Mixes
June 4, 2024 - What is automation in music? Learn how automation helps create better mixes by enabling dynamic changes to volume, panning, and effects.

Automation is an important part of creating professional and polished mixes. It enables you to program changes to various parameters of your mix over time.
Imagine having the ability to precisely dictate when a track's volume should rise to a crescendo or fade into a whisper or to command the panning of a sound from left to right to create a sense of movement—all without manually tweaking knobs or sliders in real-time. This is the convenience that automation brings to your workflow.
Automation In Music
I use automation heavily in my mixes, from simple volume-level changes to EQ, compressor, reverb, or delay parameter adjustments.
The importance of automation in music can't be overstated—it's a powerful tool that breathes life into your productions, giving you creative control to sculpt dynamic variations.
With automation, you can add emotion and interest, ensuring that your musical vision is expressed in every nuance and subtlety.
It isn't just about making things louder or quieter; it's about the intricate dance of audio elements, the push and pull of frequencies with EQ adjustments, and the ebb and flow of effects like reverb and delay that can make a piece of music truly enchanting.
By utilizing automation, you can refine your sound and achieve professional results, all while streamlining your workflow.
Whether you are balancing the mix, crafting the perfect fade-out, or getting experimental with filters and modulation, automation allows you to meticulously craft every detail in your track.
As you become more comfortable with these tools, you'll discover just how much you can do to elevate your music to new heights.
Read more: How to use Automation in Soundtrap
Fundamentals of Music Automation
Understanding Automation Data
Automation data in your Digital Audio Workstation (DAW) is what tells your software to apply specific changes to parameters like volume, pan, effects levels, and more at given points during your track.
Think of it as a set of instructions your DAW reads and executes as the song plays. The changes are plotted on a line graph within your DAW on the X-axis representing time and the Y-axis representing the parameter value.
You create automation points on the graph to define where changes occur. Connecting these points forms a curve or line, which the DAW follows.
Common Automation Modes
There are several automation modes commonly found in DAWs to suit different stages of the mixing and recording process:
Write Mode
Every move you make in Write Mode is recorded over any existing automation. Be cautious, as this mode will overwrite previous data.
Latch Mode
Latch Mode becomes active only when you adjust a parameter. It continues to write automation until you stop playback, ' latching' onto the parameter changes you make.
Touch Mode
Touch Mode writes automation only while you're making adjustments and reverts to previously written data once you let go. It's a great way to fine-tune automation without affecting the rest of the track.
Each mode serves a unique function, whether you're laying down initial automation, making adjustments on the fly, or doing precise touch-ups.

Automation in Mixing
Using Automation in the Mixing Process
As a mix engineer, I strive for a balanced and dynamic sound and am always looking for ways to breathe more life and energy into the mix. Let's look at some basic principles on how you can achieve the same with your mixes.
Mix Automation
Mix automation is your invaluable assistant for this task. It enables you to program volume changes and dynamic alterations over time, ensuring that every element in your mix sits perfectly at every moment of the song.
Think of automation as the evolution of the volume fader. Instead of manually adjusting in real time, you set the changes in advance, and they are executed automatically during playback. This allows for precise control over the dynamic range and ensures consistency in volume levels.
Volume Automation and Dynamic Range
Volume Automation is a big part of creating a dynamic mix; it's all about adjusting the volume fader of a track to emphasize or blend an instrument.
When we use volume automation, the goal is to construct more dynamic range in the track by adding contrast between the softest and loudest parts, creating emotional impact.
Mix Automation Techniques
The most common uses of automation involve making subtle tweaks or dramatic changes to how parts of the mix are heard.
Here are some specific techniques:
Set the stage with initial volume levels.
Start with static volume levels for each track to establish a baseline mix.
Automate for interest and impact.
Create crescendos or decrescendos to build tension or release.
Gradually bring an instrument in or out of the mix to maintain listener engagement.
Focus on specific points in the song.
Highlight a solo or vocal section by increasing its volume during that segment.
Use automation to drop the volume slightly for a backing track during a vocal phrase to ensure clarity.
By utilizing these techniques, you're not just mixing but guiding the listener through the song, with each element surfacing at the perfect time. Remember, the goal of automation is to enhance the musicality and emotional resonance of your mix.
Creative Use of Automation
Enhancing Dynamics and Expression
The automated volume of a track allows you to program dynamics that help highlight not only the mixed element in question but also its emotional impact on the composition.
Picture a slow crescendo in your favorite song, building tension and release:
Verse to Chorus: Gradually increase the volume to lead into the chorus.
During Solos: Emphasize a guitar or piano solo by subtly boosting its level.
Imagine these as automation curves on your screen, visually mapping the emotional build of your track. These curves and moves are like a conductor's hand guiding the expression and intensity of an orchestra, but here, you're the conductor, and the DAW is your ensemble.
Automation for Sound Design
Sound design is another area where automation can be part of crafting the audible landscape.
Filter Sweeps: Automate a low-pass filter for a sweeping effect that morphs throughout your track.
Pan Movements: Create a sense of movement by automating the stereo panorama, making sounds travel from left to right or vice versa.
Effect Parameters: Use automation to change reverb depth, delay times, or distortion levels for a momentary flair or evolving texture.
Advanced Automation Strategies
Automating Effects and Plugins
Automating effect parameters can bring life to your tracks.
What makes a track sound more human, more natural? Even if I'm producing EDM or Pop, most of the time I want the human element to shine through.
The best way to achieve this is to add subtle nuances by using automation.
Create an automation lane for each effect you wish to manipulate. For instance, use a low-pass filter to sweep frequencies, adding movement to your bassline.
Automate the cutoff frequency to transition from muffled to clear tones. Consider a gain plugin to gradually increase or decrease the volume, creating swells or fades without affecting the mixer's main fader.
Example of Low-Pass Filter Automation:
Start Point: 100 Hz cutoff
End Point: 1000 Hz cutoff
Actually, this is where I'd like to mention one of my biggest mix automation tips: I recommend using a gain plugin for volume automation when possible. This leaves the mixer faders for you to use what they were designed for: mixing.
Micro Automation for Precision
Focus on micro automation for subtle nuances that can make a big difference in your mix. With micro automation, you target specific plugin parameters over very short timeframes.
This could be a quick boost in reverb during a vocal pause or a momentary cut with high-cut filters to create a sense of space.
Tips for Subtle Changes:
Gain Adjustment: A slight dip in gain before a chorus can make it pop.
Filter Tweaks: Low-cut filters can clean up mud in the mix; automate it only when needed to maintain warmth.
You should learn these advanced strategies to ensure your automation changes serve the song and always enhance, rather than detract, from the overall sound experience.
Tools and Industry Practice
Digital Audio Workstations and Automation
Modern DAWs are truly awesome, and their flexibility and precision cannot be overstated. Here are some of the most common DAWs you might come across:
Soundtrap: A cloud-based DAW making collaboration and automation accessible from anywhere.
Ableton Live: Known for its real-time music production capabilities and live performances, Ableton Live integrates automation seamlessly.
Logic Pro: Apple's flagship DAW, popular for its extensive sound library and efficient automation workflows.
Pro Tools: Often regarded as the industry standard, it's a powerhouse for precise and in-depth automation.
FL Studio: With a user-friendly interface, it's very much favored by electronic music producers for creative automation.
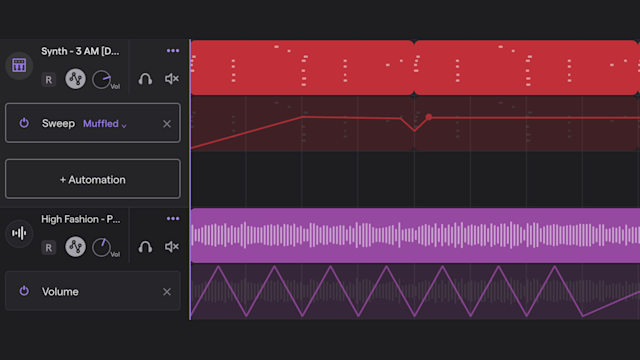
Soundtrap makes using automation easy and intuitive. You can add automation by clicking the automation icon on your track header. This gives you options of automating Pan, Sweep and Volume parameters for the track in question.
For tactile control, you have the option of using MIDI controllers and control surfaces. They offer a physical touch to your automation process and help you draw automation more intuitively, translating your physical actions into precise adjustments within the DAW.
Some of the more affordable control surfaces are products like Behringer X-TOUCH, Mackie Control Universal Pro and Avid S3. At a higher price point, there's also the Steven Slate Audio Raven MTi2.
Applying Automation to Vocals and Instruments
Vocal Automation Techniques
When you're dealing with vocal tracks, your primary concern is often ensuring the lead vocal is both consistent and prominent.
Volume Automation
Gently adjust the volume of the lead vocal to maintain presence over varying instrumentals. Increase volume for soft passages and trim it down when the accompaniment gets heavier.
Pan Automation
Apply pan adjustments to background vocals to enhance spatial depth during choruses or complex harmonies.
Reverb Send Automation
Increase the reverb send level on the vocal track to intensify emotion during a song’s climax, then reduce it during verses for clarity.
Instrumental Automation Nuances
For audio tracks of different instruments, automation can offer a range of expressive possibilities.
Kick Drum
Adjust emphasis on the kick drum during instrumental breaks or transitions by tweaking its volume or EQ settings.
Guitars or Synths
Automate the panning to create a sense of movement across the stereo field.
Basslines or Pads
Modify EQ settings on basslines or pads over time to shift their tone and prominence within the track.
Conclusion
In modern music production, automation is more than just a technical skill; it’s a creative tool that can elevate your mix to new heights.
From subtle volume adjustments to dynamic changes in high frequencies, automation allows you to craft a unique sound and achieve a professional final mix.
You can use sound design tools and automation lanes to precisely manipulate specific frequencies and control virtual instruments.
Industry professionals rely on these techniques to create expressive, polished tracks. Mastering the concept of automation can truly transform your creative process and the sound of your masters.
About the author
Tero Potila is a professional music composer and producer. His career combining knowledge and experience from music, TV, film, ad, and game industries gives him a unique perspective that he shares through posts on teropotila.com.
Kom igång med Soundtrap idag!